
Regardless of whether you’re a beginner runner or a professional, you can never quite escape the wrath of a bruised heel.
It’s one of the most common injuries runners—and athletes in general—experience, usually as a result of overuse, repetitive trauma, or sudden force against a hard, uneven surface.
If you or a person you know is suffering from a bruised heel, you need to know how to effectively treat it to avoid more serious injuries.
In this article, we’ll show you how to tape a bruised heel, as well as other steps to take after taping it up.
Let’s dive right in!
What Is a Bruised Heel? A General Overview
A bruised heel, also known as a Policeman’s Heel or a fat pad contusion, is a contusion of the tissues and bone under the heel.
The heel bone is protected by a layer of fatty tissue composed of elastic fibrous tissue septa, which separates closely packed fat cells.
This pad acts similarly to the shock absorbers found in running shoes.
When subjected to repetitive impact, the fat pad bears most of the athlete’s forward movement and weight.
The weight is transferred from the tibia through the smaller tarsal bone, which is then equally displaced through the metatarsals (the five long bones found in each foot) and out through the toes.
Bruising occurs when weight isn’t equally displaced to all parts of the foot.
The small blood vessels (capillaries) near the foot’s skin surface break due to forced or unexpected impact, causing the fat pad to flatten and be displaced sideways.
What Causes a Bruised Heel?
Whenever you jump, run, or change direction, the foot experiences a bit of stress.
Usually, this stress is manageable. However, there are other times that the stress is too much, causing foot injuries such as an ankle sprain and a bruised heel.
Here are some factors that can cause a bruised heel:
- Wearing poorly cushioned and/or improper running shoes when walking/running
- Wearing worn-out running shoes when walking/running
- Sudden force against a hard, uneven surface
- Walking or training barefoot for long periods of time
- Overtraining
- Repetitive trauma on your heel
- Landing improperly from a height
How to Tape a Bruised Heel And How To Treat Them
 In most cases, a heel bruise isn’t considered a major injury. But this isn’t to say that it should be dismissed entirely. A bruised heel can be painful and sometimes even debilitating.
The bruise can cause significant heel pain whenever you take a step, and it might even prevent you from standing for extended periods of time.
Generally, a bruised heel takes no longer than one to three weeks to heal.
If the heel bone was bruised in the process, recovery might take up to six whole weeks.
During this period, the heel must be properly wrapped and taped to speed up the healing process, as well as avoid future injuries.
Here’s how to tape a bruised heel and treat it correctly:
Step 1: Apply a Cold Compress
Before you wrap your bruised heel, you’ll first need to reduce the swelling to make the heel pain more manageable.
You can do this by applying a cold compress to the bruised area for around 10 to 15 minutes, but no more than 20 minutes to prevent skin, nerve, or tissue damage.
Apply the cold compress every two to three hours until either the pain or the swelling goes down completely.
For best results, elevate the injured foot to lower the pressure in the local blood vessels and further reduce swelling.
If you don’t have a pharmacy-issued cold compress, you can easily make one yourself with a bag of ice and a washcloth.
Place several cubes of ice in a plastic bag. Then, run a washcloth under cold water and wrap it around the plastic bag filled with ice.
Don’t wet the washcloth too much; it should be damp but not soaking wet. Squeeze out the remaining water from the towel to make sure it doesn’t drip all over the place.
Repeat as needed every two to three hours.
If you don’t have ice cubes, a bag of frozen vegetables works as an alternative. You can also soak your heel in ice water directly for up to 20 minutes, five minutes at a time.
Step 2: Stretch Your Heel
Once the swelling has gone down from the cold compress, perform a simple foot and heel stretch to further reduce heel pain and tightness.
Here’s how to do it:
- Sit on a flat surface with your legs outstretched out in front of you.
- Place the middle of a clean towel around the balls of your foot.
- Grab both sides of the towel with your right and left hand and gently put it backward, stretching your foot as you do. Don’t stretch the towel too far or you might injure your foot.
- Release the towel for five seconds and repeat the stretch again.
Do the above exercise for at least five minutes, then do this wind-down stretch:
- Cross the bruised heel over your other leg.
- With your hand, pull your toes back towards your body until you feel them stretch.
- Hold this position for 10 to 20 seconds.
- Repeat 5 to 10 times, or as necessary.
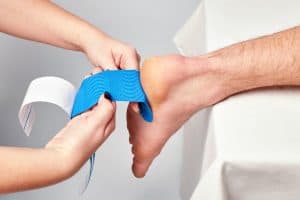
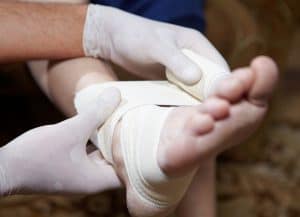
Step 3: Wrap the Bruised Area With a Bandage or Tape
Taping, also known as strapping, is a protective mechanism that not only restricts the movement of an injured or bruised joint, but also reduces swelling through compression.
It protects the injured area against over-extension, over-contraction, and cramping. Due to this, it’s one of the best short-term temporary treatments for a bruised heel.
Make sure you’re using top-grade kinesiology tape when taping a bruised heel. The tape should be stretchable, latex-free, and made of zinc oxide.
If you’re planning to wear the tape all day, ensure the product is made of breathable cotton mesh and medically approved water- and sweat-proof adhesive.
High-quality kinesiology tape can stay in place for three to four days even while exercising or showering.
Once you’ve sourced the right tape, clean the bruised foot and make sure it doesn’t have any skin oils or lotion. Then, follow these steps to properly tape the bruised heel:
- Cut off one full strip of tape (about 6 to 8 inches) and place it just under the heel with about 80% stretch, making sure your heel is fully covered.
- If the tape is too thin, add another without leaving any gaps in between.
- Tape one end of the strip just behind the ankle bone with zero stretch. Do the exact same thing on the opposite side of your foot and smooth it down to make sure it’s properly adhered to the skin.
- Cut off another strip of tape and intersect it with the first strip, again with 80% stretch, behind the heel. Then, tape the second strip towards the midfoot with zero stretch.
- Cut off a final strip of tape and place it on the sole of your foot with only 50% stretch.
- Smooth the tape and run it under your heel and along your Achilles tendon with no stretch. Tap the tape down and give the whole thing a final rub to let the adhesive really stick on your skin.
If the bruising is bad, use a pair of heel pads or heel cups to reduce the pain and pressure whenever you’re standing.
These devices can be worn inside your shoes, cushioning them from walking impact.
Wear both pads even if you’ve bruised only one of your heels. This will ensure your weight is distributed evenly with the additional support provided.
Step 4: Take a Pain Reliever
If you’re still experiencing some pain even after you’ve iced and taped your bruised heel, take an over-the-counter nonsteroidal anti-inflammatory drug (NSAID), such as:
- Aspirin
- Ibuprofen
- Naproxen
Step 5: Rest and Aftercare
Now that you’ve safely treated and taped your bruised heel, try to keep your weight off the injured joint for as long as possible.
Reschedule your afternoon plans and spend your day inside resting. Immobilize your heel for at least a day or two.
Also, try not to jog or run in the next few weeks. If you’re following a training schedule, replace your running days with upper body strength training or cross-training.
Regularly massage the bruised heel over the tape.
Start with gentle, light strokes and gradually increase the pressure until you’re able to firmly stroke the bruised area.
Focus your effort on the middle point of the bruise and use your thumb to break down the scar tissue. Just make sure you’re not hurting yourself while doing so.
While resting, keep your injured foot elevated. This not only relieves heel pain and drains fluid away from the injured area, but also reduces compression and pressure.
Plus, it helps the healing process!
Finally, don’t walk barefoot on hard surfaces. Wear socks when you’re sleeping so the tape doesn’t get rolled up on the sheets.
When you’re going out, wear comfortable shoes that fit well and don’t rub the heel too much.
If the bruising is severe, you may want to purchase special orthotic shoes.
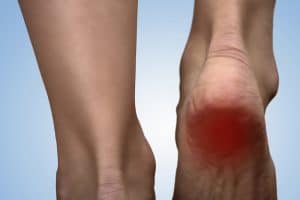
What Are the Symptoms of a Bruised Heel?
The most common and obvious symptom of a bruised heel is pain at the bottom of the calcaneus, also known as the heel bone.
When you walk or press on the heel, you’ll feel either a dull or sharp pain. If the pain is sharp, there’s a possibility that the bone is bruised alongside the muscle.
Another symptom of a bruised heel is an obvious red or purple bruise on the outside of the heel.
Like any other bruise, this discoloration occurs when blood leaks into the top layer of your skin. The bruise starts off as red, then bluish-purple or even black within a few hours.
During its healing process, the bruise will turn yellow or brown.
If the bruise doesn’t change color within a few days, begins growing in size, or becomes more painful as time passes, this can be a sign of hematoma.
A hematoma is a medical term used to describe the abnormal and rapid collection of blood outside the blood vessel. The pooling blood creates a spongy, lumpy, and almost rubbery feel.
Although not usually a cause for concern, a hematoma bruise is much more painful and takes longer to heal than a regular bruise. More care is required for this type of bruise.
It’s likewise important to note that these signs are similar to a more severe overuse injury called plantar fasciitis.
Plantar fasciitis develops as a result of overstretching, overuse, and repetitive strain.
When a person has plantar fasciitis, the band of tissue that connects the heel bone to the toes becomes swollen. It causes stabbing pain in the bottom of the foot.
The pain peaks when you first stand up or after you exercise.
When Should You Visit a Doctor?
Bruising on the heel doesn’t take longer than three weeks to heal; six if the heel bone is also bruised.
If the pain persists three to five days after the bruising and doesn’t go down even after you’ve iced the area, get yourself checked.
Likewise, visit a doctor if the bruising leaves a large purple or dark-colored discoloration running across the entire heel and further up.
The bruising might be a symptom of a bigger problem, like heel pad atrophy or rheumatoid arthritis.
If the heel pad is severely damaged, you might need a surgical procedure to repair it if standard treatments don’t work.

How to Prevent a Bruised Heel
As they say, prevention is better than cure. Employing small, healthy changes to your running routine can greatly reduce the risk of developing heel injuries.
These changes are as follows:
- Place a gel insert or cushioning pad inside your shoes whenever you go running.
- Invest in high-quality shock-absorbing running shoes/
- Don’t wear loose-fitting shoes that don’t provide little to no support when you’re running, like office shoes, flip-flops, and sandals. Instead, wear low-heeled running shoes that fit your foot comfortably.
- Replace your footwear often, ideally every 300 to 500 miles. It’s during this period that the midsole cushioning loses resiliency, making the footwear’s shock-absorbing qualities less effective.
- As much as possible, avoid stepping or running on uneven surfaces.
- Be careful when running uphill and downhill. Don’t go too fast and instead gradually build up your speed.
- Always warm-up before partaking in any sports activity. Take at least three to five minutes when warming up and don’t force your body to stretch with aggressive bouncing motions.
Final Thoughts On How to Tape a Bruised Heel
If you get a bruised heel, don’t push through the pain even if it’s minor.
Practicing and playing with a bruised heel may place you at risk for more serious types of injury, including plantar fasciitis and damage to the outer lining of the bone.
It can very well turn a short and painless rehabilitation period into a long and stressful one.
So, rest as much as you can until the bruising heals.
Follow the P.R.I.C.E method above: Protection, Rest, Ice, Compression, and Elevation.